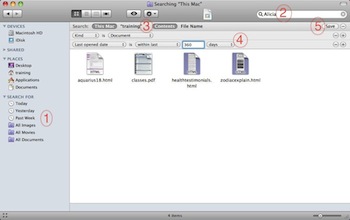
When you open up a Finder window (poke Max, the little blue guy on the left of your Dock, in the nose) and look at the blue sidebar, have you ever noticed the six items at the very bottom left? (1)
There are “Search For” folders down there! You can click on them to instantly return to your recently activities.
Click on “Today”, and you’ll see all the applications, files, emails, and everything else you’ve worked with today.
Click on “Yesterday”, and see everything you touched yesterday. “Past Week” will show you all the items you activated over the last seven days.
Below that are 3 purple folders with gears on them. These are Smart Folders. They’re not real locations on your computer; they’re Searches that gather items that match a particular criteria. Be careful with the items you see when you click on a purple Smart Folder – anything you do here will affect the genuine source file. For example, if you delete them, they will be gone from your computer entirely!
If you click on “All Images”, you can see in one place all the photos on your computer, no matter what folder they’re in. Note that this will also include your iPhoto pictures. By using this All Images folder, you can quickly skim through your photos to find the one you need. I do NOT recommend deleting photos from here, though – do that from inside your iPhoto so that you don’t create holes in your albums!
“All Movies” will search your computer for any movies from your iPhoto, iMovie, Movie folder, and email.
“All Documents” will show you everything in your Documents folder and other locations, no matter how deeply it’s buried. If you’ve been using your computer for a very long time, especially in business, this folder may work very slowly.
You can create your own folders, too. After you do a search in the oval in the upper right corner of the Finder window (2), you can see your search criteria at the top of the listings. On the left you can choose your entire computer, or just the last folder you clicked on (3). On the right, you can select whether you want to search the entire contents of the file, or just its name. That helps narrow down the search results.
You can also add additional criteria by clicking the tiny + on the far right of the criteria bar (4). It will insert a new row where you can choose your next set of rules. For example, maybe you only want Word documents, or files from a certain date. Every time you add a criteria, you’ll narrow down your results.
If you’d like to reuse that exact search in the future, click the Save button (5). Give it a descriptive name, but don’t change the location. It will save as a new purple Smart Folder at the bottom of the Finder Sidebar (1). Then all you have to do is click on the folder any time to find the files you’re looking for!


0 Comments